


【Laravel】Line Message APIのアカウント連携を制作してみた①
こんにちは。
ニシザワです。
Laravelを活用して、Line Message APIのアカウント連携をする方法について書きたいと思います。
公式は こちら
ついでに、【アクセストークン(ロングターム)】の発行と、【Channel Secret】をメモ書きしてください。

長くなりますので、本日はここまでとします。
次回は認証からアカウント連携完了まで書きます。
追記 次回のの記事はこちらです
【Laravel】Line Message APIのアカウント連携を制作してみた②
【Laravel】Line Message APIのアカウント連携を制作してみた③
ニシザワです。
Laravelを活用して、Line Message APIのアカウント連携をする方法について書きたいと思います。
公式は こちら
Webhook作成
まずはwebhookを作ります必要なLineのライブラリをインストール
composer require linecorp/line-bot-sdk
ユーザー認証部作成
php artisan auth:make
users tableに必要なカラムを追加する
    public function up()
    {
        Schema::create('users', function (Blueprint $table) {
            $table->increments('id');
            $table->string('name');
            $table->string('email')->unique();
            $table->string('uuid')->nullable()->unique(); //ここ追加
            $table->string('nonce')->nullable(); //ここ追加
            $table->string('password');
            $table->rememberToken();
            $table->timestamps();
        });
    }
routing作成
Route::post('/webhook', 'ApiController@webhook');
Lineのディベロッパーコンソールにて【Webhook URL】を https://hoge.com/webhookと登録してください。ついでに、【アクセストークン(ロングターム)】の発行と、【Channel Secret】をメモ書きしてください。
トークンの登録
.env
LINE_API_KEY=your access token
LINE_CHANNEL_SECRET=your channel secret
config/auth.php
    'line-api-key' => env("LINE_API_KEY", "HOGE"),
    'channel-secret' => env("LINE_CHANNEL_SECRET", "FUGA"),
先程メモしたトークンを埋め込んでおきます。
Controller作成
ApiController.php
     /**
     * @param Request $request
     * @throws \LINE\LINEBot\Exception\CurlExecutionException
     */
    public function webhook(Request $request){
        $events = $request->get("events", []);
        $userId = array_get($events, "0.source.userId");
        $text = array_get($events, "0.message.text");
        $replayToken = array_get($events, "0.replyToken");
        $user = User::query()->where("uuid",$userId)->first();
        //メッセージを送ったLineユーザーが連携していない場合
        if(is_null($user) || is_null($user->nonce)){
            $this->accountLink($userId, $replayToken);
            return;
        }
    }
ここでは、メッセージを送ってきたLineユーザーがアプリケーション側で紐ぞけできていなかった場合にアカウントリンクを送るように指示しています。
アカウントリンク用のテキストメッセージを送る
Route::get("api/login", "Api\LoginController@showLoginForm")->name("api.login");
Route::post("api/login", "Api\LoginController@login");
ログイン認証部を作っておきます。
     /**
     * @param string $userId
     * @param string $replayToken
     * @throws \LINE\LINEBot\Exception\CurlExecutionException
     */
    private function accountLink(string $userId, string $replayToken){

        $httpClient = new \LINE\LINEBot\HTTPClient\CurlHTTPClient(config("auth.line-api-key"));
        $response = $httpClient->post("https://api.line.me/v2/bot/user/{$userId}/linkToken",[]);

        $rowBody = $response->getRawBody();
        $responseObject = json_decode($rowBody);
        $linkToken = object_get($responseObject, "linkToken");
        $bot = new \LINE\LINEBot($httpClient, ['channelSecret' => config("auth.channel-secret")]);

        $templateMessage = new TemplateMessageBuilder("account link", new ButtonTemplateBuilder("アカウント連携します。", "アカウント連携します。", null, [
            new UriTemplateActionBuilder("OK", route("api.login",["linkToken" => $linkToken]))
        ]));
        $response = $bot->replyMessage($replayToken, $templateMessage);
        $lineResponse = $response->getHTTPStatus() . ' ' . $response->getRawBody();
        \Log::info($lineResponse);
    }
トークンを使って、アカウントのログイン認証URLをメッセージで送るようにします。 これで、アカウントリンクをしていないユーザーがメッセージを送ると下記のように返ってきます。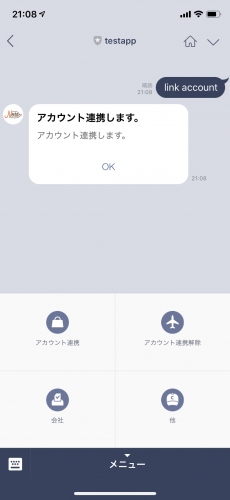
長くなりますので、本日はここまでとします。
次回は認証からアカウント連携完了まで書きます。
追記 次回のの記事はこちらです
【Laravel】Line Message APIのアカウント連携を制作してみた②
【Laravel】Line Message APIのアカウント連携を制作してみた③


