


LaravelのNotificationを使用したメール送信機能
はじめまして、けいちゃんです。
数ヶ月前にこの会社に入社しました。
周囲の方々の技術力が高く、刺激を受けながら業務に邁進しています。
今回は、業務で私が実装した、LaravelのNotificationメール送信機能についての記事です。
前提として、メール送信の環境構築等はできているものとします。
app/Models/User.php
メールアドレスのカラムを別のカラムにしたい場合は以下のメソッドを追加することで指定のカラムに変更が可能です。
各項目についてはMailMessageクラスで指定が可能です。
Illuminate/Mail/resources/views
・メール本文(HTMLメール、テキストメール共通)
Illuminate/Notifications/resources/views
・メール全体のbladeは /resources/views/vendor/mail/html 配下に同名のbladeを配置することで差し替えが可能です。
・メール本文のヘッダとフッタのbladeは /resources/views/vendor/mail/text 配下に同名のbladeを配置することで差し替えが可能です。
・メール本文のbladeは、Notificationを実行するクラスで使用した MailMessage の markdown メソッドを使用することで差し替えが可能です。
LaravelにはNotification以外にも、Mailableというメール送信機能があります。
Mailableもメール送信機能として充分な機能が備わっているのですが、
弊社では、MailableよりNotificationを推奨しています。
理由は以下の2点です。
Laravelは色々な手段でメール送信を行うことができますね。
今回使用したNotificationクラスでは、メールだけでなく、SMSやSlackの通知なども送ることができます。
Laravelドキュメントにも様々な使い方が書かれています。
ぜひ読んでみてください。
数ヶ月前にこの会社に入社しました。
周囲の方々の技術力が高く、刺激を受けながら業務に邁進しています。
今回は、業務で私が実装した、LaravelのNotificationメール送信機能についての記事です。
前提として、メール送信の環境構築等はできているものとします。
環境とソフトウェアのバージョン
- OS: macOS Monterey 12.2.1
- Docker Desktop for Mac 2.5.0.0
- PHP: 7.4.25
- Laravel Framework 6.20.31
ソースコードの作成
ModelにNotifiableを追加する
メール送信先のメールアドレスが登録されているModelで、Notifiableを使用できるようにします。app/Models/User.php
<?php

declare(strict_types=1);

namespace App\Models;

use Illuminate\Foundation\Auth\User as Authenticatable;
use Illuminate\Notifications\Notifiable;

/**
 * Class User
 * @package App\Models
 *
 * @property int $id ID
 * @property string $name 名前
 * @property string $email メールアドレス
 */
class User extends Authenticatable
{
    use Notifiable;  // ←追加

    /**
     * @var string[]
     */
    protected $fillable = [
        'name',
        'email',
    ];
}
こうすることで、usersテーブルのemailを自動的にメールの送信先とすることができます。メールアドレスのカラムを別のカラムにしたい場合は以下のメソッドを追加することで指定のカラムに変更が可能です。
/**
 * メールチャンネルに対する通知をルートする
 *
 * @param  \Illuminate\Notifications\Notification  $notification
 * @return array|string
 */
public function routeNotificationForMail($notification)
{
    // メールアドレスのみを返す場合
    return $this->email_address;

    // 名前とメールアドレスを返す場合
    return [$this->email_address => $this->name];
}
Notificationを実行するクラスを作成
app/Notifications/SampleNotification.php
<?php

declare(strict_types=1);

namespace App\Notifications;

use Illuminate\Bus\Queueable;
use Illuminate\Notifications\Messages\MailMessage;
use Illuminate\Notifications\Notification;

class SampleNotification extends Notification
{
    use Queueable;

    /**
     * @var string
     */
    private string $content;

    /**
     * Create a new message instance.
     *
     * @return void
     */
    public function __construct(string $content)
    {
        $this->content = $content;
    }

    /**
     * Get the notification's delivery channels.
     *
     * @param  mixed  $notifiable
     * @return array
     */
    public function via($notifiable): array
    {
        return ['mail'];
    }

    /**
     * Get the mail representation of the notification.
     *
     * @param mixed $notifiable
     * @return MailMessage
     */
    public function toMail($notifiable): MailMessage
    {
        return (new MailMessage())
            ->subject('メールの件名')
            ->line($this->content)  // 本文
    }
}
Notificationを呼び出すクラスを作成
app/Services/SampleService.php
<?php

declare(strict_types=1);

namespace App\Services;

use App\Models\User;
use App\Notifications\SampleNotification;

class SampleService
{
    /**
     * メールを送る
     *
     * @param User $user
     * @param string $content
     */
    public function send(User $user, string $content): void
    {
        $user->notify(new SampleNotification(
            $content
        ));
    }
}
コードを実行し、メールを送信してみます。
受信できたら成功です。
メールテンプレートbladeのカスタマイズ
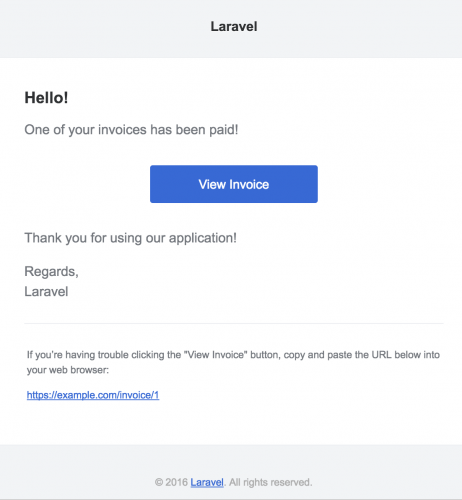
Notificationを使用して送信するメールには、HTMLメール、テキストメールともにデフォルトのbladeがあります。
HTMLメールでは、bladeのカスタマイズをせずにメールを送信すると以下のようなメールが送られます。各項目についてはMailMessageクラスで指定が可能です。
Laravelで使用されているメールテンプレートbladeは以下に配置されています。
blade
・メール全体のレイアウトとメール本文のヘッダとフッタ(HTMLメールは /html 配下、テキストメールは /text 配下)Illuminate/Mail/resources/views
・メール本文(HTMLメール、テキストメール共通)
Illuminate/Notifications/resources/views
メール全体のレイアウトが layout.blade.php(テキストメール:layout.blade.php)
メール本文のヘッダとフッタが message.blade.php(テキストメール:message.blade.php)
メール本文が email.blade.php
です。
bladeのカスタマイズ
カスタマイズは以下の方法で行います。・メール全体のbladeは /resources/views/vendor/mail/html 配下に同名のbladeを配置することで差し替えが可能です。
・メール本文のヘッダとフッタのbladeは /resources/views/vendor/mail/text 配下に同名のbladeを配置することで差し替えが可能です。
・メール本文のbladeは、Notificationを実行するクラスで使用した MailMessage の markdown メソッドを使用することで差し替えが可能です。
public function toMail(): MailMessage
{
    return (new MailMessage())
        ->subject('メールの件名')
        ->line($this->content) // 本文
        ->markdown('vendor.mail.mail');  // ここでbladeを指定する

        ->markdown('vendor.mail.mail', ['url' => 'http:xxxx.jpg']);  // 第2引数でbladeに変数を渡すこともできます
}
その他のカスタマイズ方法
view メソッドを使用しテンプレートを指定することも可能です。
/**
 * @param  mixed  $notifiable
 * @return MailMessage
 */
public function toMail($notifiable): MailMessage
{
    return (new MailMessage)->view(
        'mail.blade.name', ['url' => 'http:xxxx.jpg']
    );
}
テストコード
メールを送信することができたかをテストしたいので、Notificationのテストコードも書いていきましょう。
tests/Unit/SendNotificationTest.php
<?php

namespace Tests\Unit;

use Illuminate\Notifications\Messages\MailMessage;
use Illuminate\Support\Facades\Notification;
use App\Notifications\SampleNotification;
use App\Services\SampleService;
use App\Models\User;
use Tests\TestCase;

class SendNotificationTest extends TestCase
{
    /**
     * @testdox メール送信が成功
     */
    public function testNotificationSuccess(): void
    {
        Notification::fake();
        Notification::assertNothingSent();

        $user = factory(User::class)->create();
        $user2 = factory(User::class)->create();
        $service = $this->app->make(SampleService::class);
        $content = 'メール本文';

        $service->send($user, $content);

        // メール送信対象者にメールが送られているか
        // 送られるメールの内容もテストできます
        Notification::assertSentTo(
            $user,
            SampleNotification::class,
            function (SampleNotification $notification) use (
                $user,
                $content
            ) {
                $mail = $notification->toMail($user);
                $this->assertEquals(
                    (new MailMessage())
                        ->subject('メールの件名')
                        ->line($content),
                    $mail
                );
                return true;
            }
        );
        // メール送信対象者にメールが送られている回数は1回か
        Notification::assertSentToTimes($user, SampleNotification::class, 1);

        // メール送信対象でない人物にメールが送られていないか
        Notification::assertNotSentTo(
            [$user2], SampleNotification::class
        );
        // メール送信対象でない人物にメールが送られている回数は0回か
        Notification::assertSentToTimes($user2, SampleNotification::class, 0);
    }
}
MailableよりNotificationを使う理由
ここまでNotificationを使用したメール送信機能のご紹介をいたしましたが、LaravelにはNotification以外にも、Mailableというメール送信機能があります。
Mailableもメール送信機能として充分な機能が備わっているのですが、
弊社では、MailableよりNotificationを推奨しています。
理由は以下の2点です。
- Modelと連携することができる
- メールに限らず通知を送ることができるので、後で通知の方法を追加したり変えることができる
最後に
メール送信機能を初めて実装したので、色々調べながらの実装でしたが、Laravelは色々な手段でメール送信を行うことができますね。
今回使用したNotificationクラスでは、メールだけでなく、SMSやSlackの通知なども送ることができます。
Laravelドキュメントにも様々な使い方が書かれています。
ぜひ読んでみてください。


